Simple Network Management Protocol (SNMP) is an application layer protocol to collect and organize information about device in an IP network. In this lesson, we will learn to configure SNMP v2c in Cisco device.

Pre-Check:
Make sure port 161 is open for SNMP pulling from the device. And, also 162 need to be open to send trap from device to snmp server.
Configuration of SNMP in Cisco:
Enabling the SNMP v2c in Cisco IOS devices are easy. You just need to run below commands-
snmp-server community letsconfigRO RO
snmp-server community letsconfigRW RW
Explanation:
letsconfigRO is the community-string for read-only.
letsconfigRW is the community-sting for read-write.
SNMP Trap
If you want to send notification from device to SNMP server, then you need to enable trap and specify the SNMP host server.
snmp-server host 192.168.2.181 version 2c letsconfigRO
snmp-server enable traps
Explanation:
192.168.2.181 is the SNMP server address.
version 2c is the SNMP version.
letsconfigRO is the community-sting for SNMP trap.
snmp-server enable traps commands enables trap for all the notification. If you want, you can enable trap for particular incident as per your requirements.
Example:
LetsConfig-RTR(config)#snmp-server enable traps ?
  aaa_server       Enable SNMP AAA Server traps
  atm              Enable SNMP atm traps
  auth-framework   Enable SNMP CISCO-AUTH-FRAMEWORK-MIB traps
  bfd              Allow SNMP BFD traps
  bgp              Enable BGP traps
  bstun            Enable SNMP BSTUN traps
  bulkstat         Enable Data-Collection-MIB Collection notifications
  cef              Enable SNMP CEF traps
  cnpd             Enable NBAR Protocol Discovery traps
  config           Enable SNMP config traps
  config-copy      Enable SNMP config-copy traps
  config-ctid      Enable SNMP config-ctid traps
  cpu              Allow cpu related traps
  diameter         Allow Diameter related traps
  dlsw             Enable SNMP dlsw traps
  dsp              Enable SNMP dsp traps
  eigrp            Enable SNMP EIGRP traps
  entity           Enable SNMP entity traps
  entity-ext       Enable SNMP entity extension traps
  ethernet         Enable SNMP Ethernet traps
  event-manager    Enable SNMP Embedded Event Manager traps
  firewall         Enable SNMP Firewall traps
 --More--

LetsConfig-RTR(config)# snmp-server enable traps snmp authentication linkdown linkup coldstart warmstart
Here is the final configuration.
snmp-server community letsconfigRO RO
snmp-server community letsconfigRW RW
snmp-server enable traps snmp authentication linkdown linkup coldstart warmstart
snmp-server host 192.168.2.181 version 2c letsconfigRO
Verification
First of all, run show snmp from the device.
LetsConfig-RTR#show snmp
10 SNMP packets input
    0 Bad SNMP version errors
    4 Unknown community name
    0 Illegal operation for community name supplied
    0 Encoding errors
    6 Number of requested variables
    0 Number of altered variables
    6 Get-request PDUs
    0 Get-next PDUs
    0 Set-request PDUs
    0 Input queue packet drops (Maximum queue size 1000)
16 SNMP packets output
    0 Too big errors (Maximum packet size 1500)
    0 No such name errors
    0 Bad values errors
    0 General errors
    6 Response PDUs
    10 Trap PDUs
SNMP Dispatcher:
   queue 0/75 (current/max), 0 dropped
SNMP Engine:
   queue 0/1000 (current/max), 0 dropped

SNMP logging: enabled
    Logging to 192.168.2.181.162, 0/10, 10 sent, 0 dropped.
Secondly, you can check from SNMP server. I will recommend lightweight free application named SnmpB. You can download and install SnmpB from sourceforge.
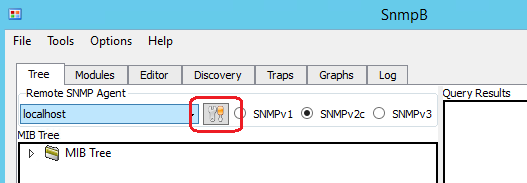
After install, open the application and go to EDIT as per below diagram.

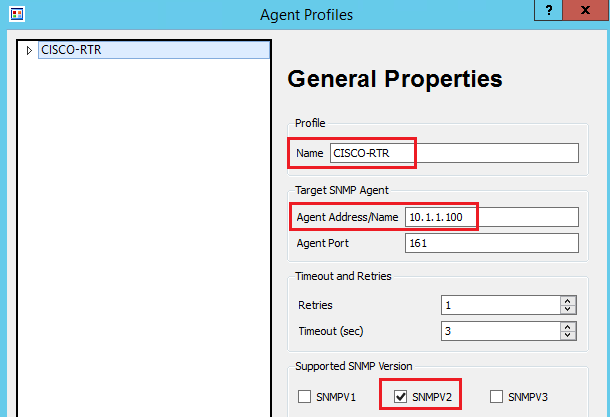
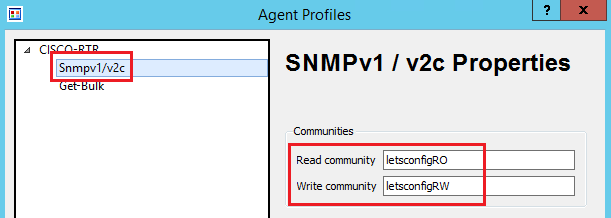
Now, add all the details, including the community string.


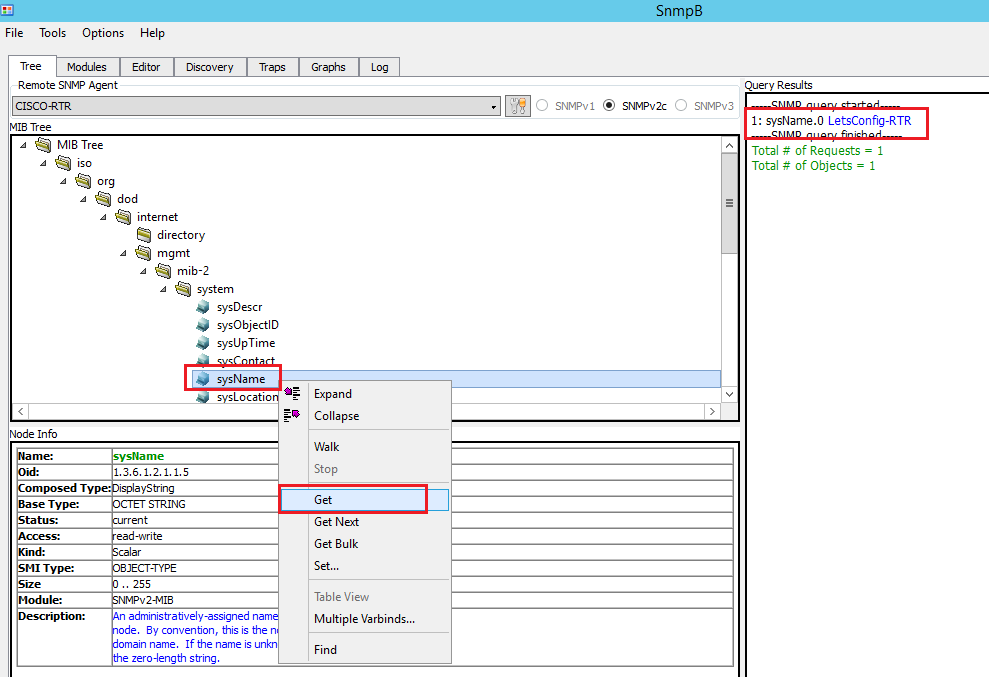
SNMP server setup is done. Let’s pull some information of the device. Following steps to pull device hostname. You can pull other information as well.

We also can check SNMP trap information. Just go Trap and see the information. You can bounce your interface to see the output (just run shutdown and no shutdown command) to generate trap information.


